
How to run paint.net on a Mac
This tutorial will explain how to run paint.net on a Mac using VirtualBox. This approach can also be used to run paint.net on Linux or an older version of Windows. Other programs such as Parallels may be faster and easier to use, but are more expensive. Another option is to run Windows separately using Bootcamp, but this would prevent you from running paint.net at the same time as Mac applications.
Alternatively, you may wish to look at alternatives to paint.net.
First you will need a copy of Windows 7/8/8.1, which can be found on Amazon. I suggest buying the latest version possible, as earlier versions may be unsupported in some future version of paint.net.
1. Install VirtualBox. Go to the download page and click the link next to “VirtualBox for OS X hosts.” Once the disk image has downloaded open it and run the installer. Once the installer has finished, open Launchpad and click on the VirtualBox icon.
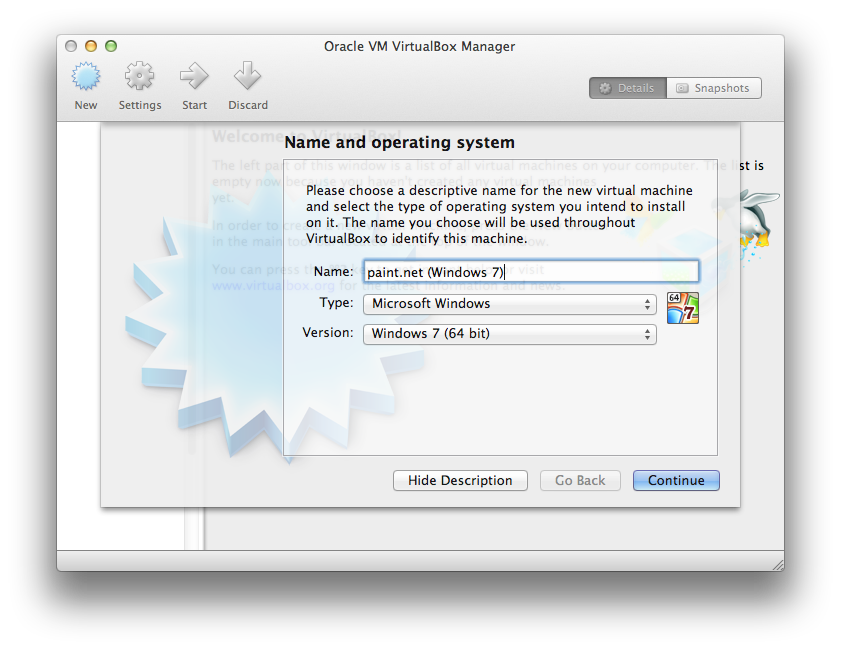
Once in VirtualBox, click “new” to create a new VM. Enter a name and select the version of Windows you are using.
Go through the rest of the wizard. All of the defaults should be fine. Windows should be installed on a new virtual hard disk.
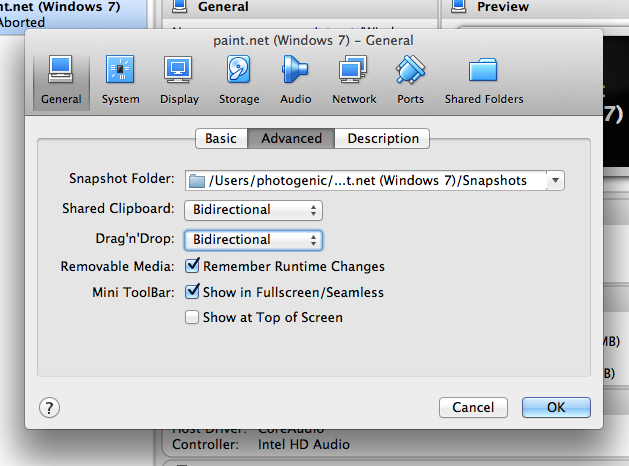
2. Select the VM you have created and click “settings.” In general -> advanced, set both “shared clipboard” and “drag n’ drop” to “bidirectional.” This will allow you to copy and paste between paint.net and other programs.
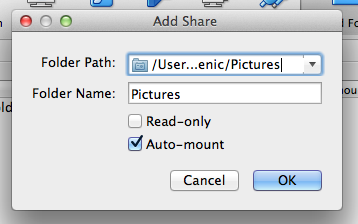
Go to the “shared folders” tab and click the green add folder icon. Select your pictures directory for the folder path. Uncheck read-only and check auto-mount. This will allow you to open and save images in your pictures folder from paint.net.
3. Close the settings, insert the Windows DVD and click “start.” VirtualBox should ask you to select a virtual optical drive. Make sure “host drive” is selected and click “start.”
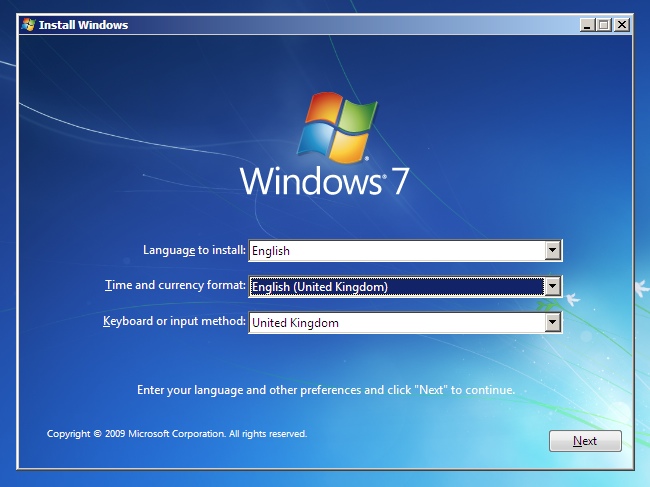
One the installer has loaded, select your language/country and click “next” and then “install now.”
You will be asked a series of questions, depending on which version of Windows you are installing. Roughly, you should accept the license terms and click “custom (advanced)” to install a new copy of Windows. Windows will ask you where to install it, you should only have the option of “disk 0 unallocated space.” Select it and click next, then wait for the installation to complete. Virtual Windows will restart several times during the process.
Once the installation has finished, enter a username when asked (you should probably leave the password blank). Select “use recommended settings”/express installation.
If asked, make sure the time zone is correct and select “public network” for the network type.
4. Once you reach the desktop, click the start button and search for “windows update.” You should install all the important updates. Some of these are required by paint.net.
5. You should also install the guest additions. To do this click devices -> insert guest additions cd image. If the installer doesn’t start automatically, start it manually by clicking start -> computer -> cd drive -> VBoxWindowsAdditions. When asked if you want to install drivers, select “always trust software from Oracle” and click “install.” Once the installer has finished, virtual Windows will be rebooted.
6. Now install paint.net. The .NET framework may be installed at the same time.
Launch paint.net. Click View -> Switch to Seamless Mode to make paint.net a regular window. You will need to do this each time you start the virtual machine.
Your pictures directory will appear as a new drive in “computer.” You can also copy/paste and drag-and-drop between paint.net and other applications.