Cutting out images in paint.net
This tutorial will guide you through the process of cutting out parts of photos and other images for use separately. If your final image has a transparent background after completing this tutorial (i.e. you have no plans to add a background) then you should save it as a PNG or GIF (preferably PNG) – for more information see Myrddin's FileType tutorial.
1. Find your image – I’ll be using this stock photo.

2. On a new layer with a relatively thin width, (depending on the size of your image) cover the perimeter of the part of the image you wish to cut out with the brush and line tools being careful to leave no gaps.

3. Now select the magic wand tool (any tolerance below 60% should work fine) and click inside the outline.

4. Now hold down Ctrl + I to invert the selection, and then select the background layer.

5. Now press the “delete” key and remove the layer you use to draw the outline, then crop the image to the part you have cut-out.

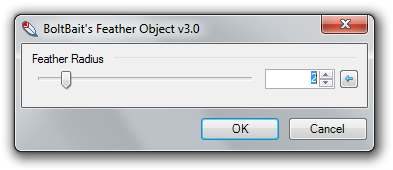
6. Use the feather plugin to make the edges less aliased.